Sunday, March 31, 2013

Happy Easter - He is Risen!

He is risen indeed!


Today is a celebration of Jesus' resurrection from the dead.   Because he crushed the curse of death, we have assurance that we too will have victory over the grave.  Because of His grace, on the day I die, I'll be more alive than ever before, standing in His presence.

I wish you and yours the same hope of eternal joy .... Happy Easter!

Wednesday, March 27, 2013

Room Transformation Before and After - Dining and Kitchen

This is a project that developed from the bathroom remodel I mentioned several days ago.  The old expression, "One thing leads to another...." was definitely true here.  When we changed our bathroom, we decided on a new white door, which naturally meant that the entire dining room needed to be changed from dark pine to white bead-board, right?

Here's what the dining room looked like BEFORE:


Notice the new WHITE door in the middle of all that pine paneling? Busy wallpaper border was 13 years old and I was tired of it.

In this picture you can see the cute new bathroom peeking out. This room was begging to be refreshed!


AFTER:  I went with a continuation of the cottage look, and painted the woodwork all white, including the ceiling.  After much deliberation and research, I went with an oil-based primer to prevent the pines knots from bleeding through in the future.  Over that I used good quality paint (Benjamin Moore Satin Impervo). The room looked twice as big when I was finished!


The wall color is "Almost Heaven" and won the family vote after we looked at several samples on the wall.  The vintage signs are from a little shop I found while vacationing up north. The smaller one says, "Traverse City - Delightful Days" and reminds me of wonderful vacations spent there. The new light fixture was another fun find, called a "milk can lid" style.


Here's another view, from the living room.
BEFORE


And AFTER:


Since "one thing leads to another," it was also mandatory to continue this look into the kitchen, which is connected closely to the dining room.  Here's how it turned out:


Big difference isn't it?  Now I need new dining room furniture. :)

Sunday, March 24, 2013

Don'ts for Husbands, Don'ts for Wives - Book Review


Don'ts for Husbands, Don'ts for Wives - 1913 Edition by Blanche Ebbutt

The best single word I can use to describe this book is "charming".  The title alone makes me smile,  and the content at times has had me laughing out loud.  Although it was written 100 years ago, most of the advice it contains is timeless... (Some of the other advice.... not so much. But the outdated stuff is actually hilarious and probably my favorite lines in the book =)

I first saw this book in the form of two separate books in a bookstore in Scotland.  I was quite tempted to purchase them, but my suitcase was already jammed full and heavy, so I resisted.  Once I got home, I searched online, and found this single volume that contains the content of both books.

The entire book is written as a list of "Don'ts", categorized by topic.
Here are a few sample pieces of advice for husbands:
* "Don't slouch. No one who cares for a man likes to see him acquiring a slouching habit."
* "Don't begin your married life by expecting too much. If you expect little, you will be saved a good deal of disappointment."
* "Don't say anything to your children that may tend in any way to lower their estimation of their mother."
* "Don't delegate the carving to your wife on the plea that you 'can't' carve. You should be ashamed to own that you can't do a little thing like that as well as a woman can. It is just laziness on your part. Besides a man ought to take the head of his own table."

It's been fun reading these out loud to my husband! There's something less threatening about hearing Blanche tell him how to behave properly.

Now a few "Don'ts" for wives:
* "Don't keep your sweetest smiles and your best manners for outsiders; let your husband come first."
* "Don't check your husband's high spirits. Let him sing at the top of his voice in the bathroom, or whistle out of tune on the stairs, and be thankful for a cheerful man about the house."
* "Don't forget to 'feed the brute' well. Much depends on the state of his digestion."

There are hundreds more! Advice on personal habits, finances, household matters, recreation, children and several other topics will remind you that true wisdom never goes out of date.  Check it out at Amazon.com.


Saturday, March 16, 2013

A-mazing Homemade Italian Meatballs - Recipe and Tutorial

   This is my first recipe, and by far the longest post on my blog to date. But hang in there with me, and I promise it will be worth it.  If you read through this entire post and are not drooling by the end, then I'm guessing your salivary glands are broken. (Or my little camera is not good enough to capture the true beauty of the exquisite subject at hand.)

   Back in 2002, my dear friend Cara from Texas came to visit me at the Red Farmhouse. While she was here, she taught me how to make her dad's authentic Italian meatballs (and sauce, which I will have to share another time), creating a delicious, memorable meal, and leaving me with a couple more meals in the freezer for later.  I still make these meatballs (my slightly tinkered version) on a semi-regular basis. (Not often, because they are special and require a bit of work.) Today I thought I'd share them. Here are the handwritten recipe and instructions she gave me.  I feel happy every time I pull it out and read it again.

I had to make a double batch this time because I am feeding a lot of people on Sunday and  I want to have plenty.  Below is the single recipe I use. (I will include all the directions at the end of the post so you can easily copy and paste the ingredients and the directions onto a document you can keep and print out. I'm pretty sure you will want to do that.)

A-mazing Homemade Italian Meatballs

2   pounds extra lean ground beef
1   pound lean ground pork (plain pork, not sausage)
5   eggs
5-6 cloves finely minced garlic (fresh is best)
1   cup freshly grated Romano cheese (shredded style, not the powdery stuff)
1/2 cup chopped parsley, Italian flat leaf preferred (curly is OK)
1   teaspoon freshly ground black pepper, optional
1 1/2 cup Italian style seasoned bread crumbs
Water to moisten the crumbs, approx. 1/2 cup

Remove meat and eggs from the refrigerator for at least 20 minutes before beginning to mix ingredients.  Here are all the ingredients assembled and ready to go:

Preheat oven to 375 degrees to bake the meatballs.  (You can fry them in a large skillet in a little bit of olive oil, but I never do.)

You will need an extra-large bowl, a medium bowl and a small bowl handy. (Also get your large cookie sheet, and a baking rack if you have one, oiled and ready because when it is time to use them, your hands will be a mess and you won't want to stop and wash them. Trust me on this.)

First, dump the bread crumbs into the medium bowl, and sprinkle with the water to moisten.  Mix in just enough water so it clumps together if you squeeze a bit, but not so much that it's wet. It should still be crumbly. (You may need a little more or a little less than 1/2 cup.) Set aside for now:
Beat the eggs in the small bowl and set aside.

Next, mince the garlic and mix it with the cheese and optional black pepper in the large bowl. Then mix the parsley in with the garlic and cheese.Combine well:

A word about the parsley... you will use almost half of a bunch that you purchase if you chop it well. (I use my ancient Little Oscar, which still works like a charm.) I like to cut away most of the stems and only mince the leaves.  The parsley I bought was very stemmy, so I trimmed it quite a bit:

Next, crumble all of the meat into the bowl over the cheese mixture.  Break the meat up into small pieces as you sprinkle it into the bowl.
Dump in the reserved bread crumbs. Now comes the messy part - you must use your hands. (It's a meatball rule.)  Quickly mix all the ingredients together. Bring all the cheesy mix up from the bottom of the bowl and massage it gently.  Do not overwork the mixture or the meatballs will be too dense and tough.

Next drizzle the beaten eggs over the meat/crumb mixture.  Again, work the eggs in quickly and lightly with your hands, until eggs are just absorbed. (Your hands will feel pretty gross at this point, but you're almost done.)

(Photo confession: I forgot to add the breadcrumbs until after I added the eggs this time. 
Oops. Still turned out fine!)

Time to form the meatballs! (Right now is when you silently say, "Thank you Donna for warning me to have the baking sheet ready."  It's such a pain to wash your hands now, get the cookie sheets out, and then handle the meat again. I know. From experience.)  If you did not heed my advice, now is when you yell loudly for someone in the house to come and get you a cookie sheet.

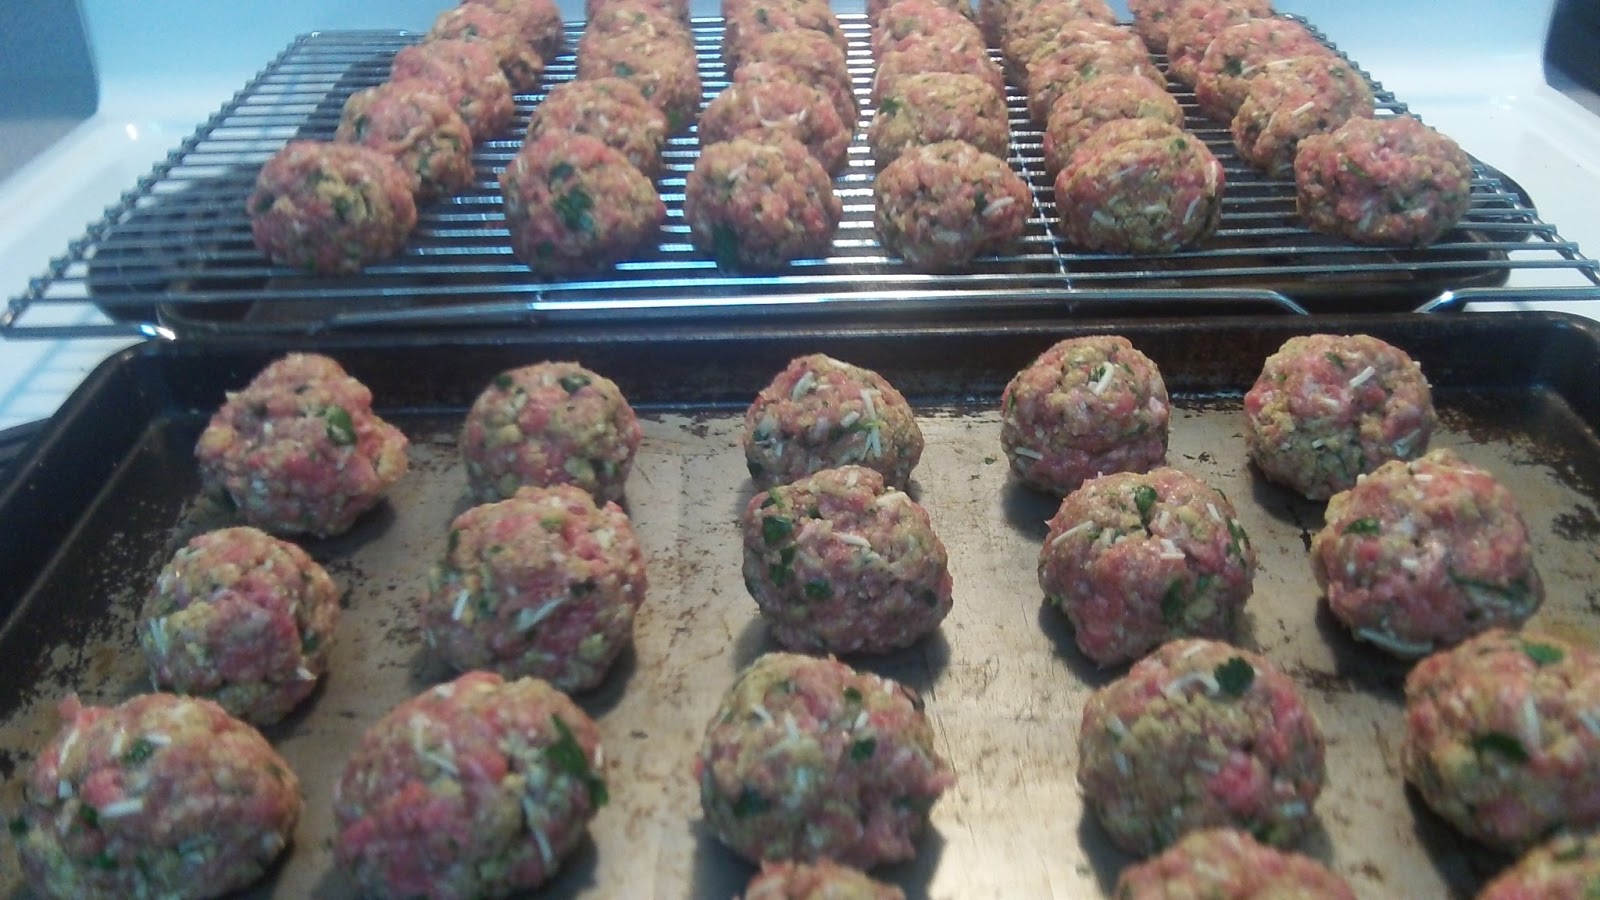
You can place the meatballs right onto a cookie sheet, and they will end up slightly flattened on the bottom.  I prefer a baking rack placed over the cookie sheet. This lets the excess oil drip away from the meatballs and they have a nicer round shape at the end.  But flat-bottom meatballs are just fine too, and actually show that you are not serving the people you love some perfectly round, pre-fab, preservative-laden meatball.  :)
(I only have one rack, so I did it both ways this time.)

Scoop up enough meat mixture to make a meatball about the size of a golfball, or slightly smaller.  This recipe will yield about 40 meatballs of this size. (Well I got 39 per recipe this time, but hey, close enough.) Continue until all meat is used up.

Bake for about 20-25 minutes.  Your house, which was already smelling good from the garlic and parsley, will now begin to smell like Italian Heaven. (Warning: people may begin to drift into your kitchen and ask what's cooking...which means they want one. Only you can decide whether or not you are willing to share at this point.)

Voila! A huge pan (or three!) full of luscious balls of meat-yumminess. I'd rather take these out of the oven than chocolate chip cookies!

Add them to a pot of homemade or prepared pasta sauce and let simmer for at least a couple of hours to flavor the sauce.

Stir gently from time to time, so they don't stick on the bottom, but be careful since they are a bit fragile.  Enjoy over pasta of your choice!

pasta with meatballs
(These meatballs also freeze beautifully, and make a wonderful quick meal on a busy day.)
As promised, here are the condensed instructions you can copy and use with recipe above:

   Remove meat and eggs from fridge at least 20 minutes before you proceed with the recipe.
   Preheat oven to 375 degrees.
   Have the following ready: an extra-large bowl, a medium bowl, a small bowl, and a lightly greased cookie sheet and baking rack.
   In medium bowl, thoroughly moisten the bread crumbs with water.  They should be crumbly, not soggy. Use more or less than 1/2 cup, depending on humidity etc. Set aside.
   In small bowl, beat eggs. Set aside.
   In large bowl, pour the cheese, minced garlic and optional pepper.  Toss together.  Add chopped parsley and combine well.
   Crumble the meat into very small pieces over the cheese mixture. Sprinkle the reserved breadcrumbs over the meat.  With your hands, combine the meat-cheese-crumb mixture.  Work quickly and lightly - Don't overwork the meat or it will be dense and tough.
   Now drizzle the beaten eggs over the meat-cheese-crumb mixture and quickly work in until egg is just absorbed into the mix.  Again, don't overdo this.
   Form into meatballs, about the size of a golf ball.  Set on baking rack or directly onto cookie sheet.
   Bake in preheated oven for approx. 20-25 minutes. Put directly into sauce to simmer (at least one hour - longer is better), or allow to cool and chill/freeze for later. Serve with love over hot pasta of your choice.

**Please leave me feedback, since this is the first recipe I've posted.  Is it clear? Are there too many photos?  Did it make you hungry?  I'll try to do better next time!


Tuesday, March 12, 2013

Bathroom Remodel

This is the first post to show some of the changes we have made inside the farmhouse since moving in here. Our bathroom was actually featured last year on a home improvement website by author Kathryn Bechen.


It's been a year, but the bathroom still feels brand-new to us. The room we replaced was over 50 years old, and really needed to be completely gutted and made over..... so that's what we did.

The color is Glidden's "Soft Blueberry" and we still like it. I was a little afraid of such a bold color, but the white trim balances it nicely.

We have so enjoyed the new space... and so have our guests!


We LOVE the clawfoot tub!
And the cabinet on the left was custom made for the space. So was the shelf for towels and baskets.

The towel hooks behind the tub redeem "dead space".

*Keep reading... this is blog "dead space", and I don't have a way to redeem it.  :)


There's a huge walk-in shower on the right by the sink.

And we've decorated with antique bottles and mason jars to add some history to the room.

(More dead space here, but there's one more photo to see. Keep scrolling!) ... ..........


Here's the potty space beside the shower. We found this cool, galvanized display piece at a cute shop in Sutton's Bay (Northern Michigan) and filled the cubby holes with vintage jars, sea shells and other knick-knacks.  I'm not usually fond of too many knick-knacks, but I like them here.

It's a wonderful bathroom, and friends have crowded in to see it when they come over.  We actually had 11 people in this bathroom at one time, but that is not typical.


Tuesday, March 5, 2013

Church Planting.... Again


Almost fifteen years ago, my husband accepted a call to serve as pastor to a church plant in the Midwest.  Sensing God’s call, we packed up our life and moved with our four little boys from a happy ministry life in Florida to an unknown future. We left a sunny, beach-front community for a rolling winter landscape.  We traded a large, well-established congregation for a small group of families who needed a shepherd. There were many unknowns, and God, as always, was faithful.  Our experience has been a wonderful, rewarding and fruitful. 

The church God planted is a healthy, thriving congregation.  It has never grown by leaps and bounds, but rather slowly and steadily, one or two families at a time.  The church has outgrown three different locations and now worships in its own beautiful facility. We have invested our lives here and are richer for it.

So now we are going to leave.

The decision to go has not been made lightly.  We have tried to think through all the implications of our leaving and the many people it will affect.  We have sought God’s will in prayer.

Having sent three sons off to college, with our youngest going this year, I know that the time to part with loved ones always feels like it’s too soon.  When did the little boys whose shoes I tied and whose bruises I kissed become old enough to go away and live without me?  I want to hold on to them just a little longer, even when I know that it is time for them to leave.  I cry when they go.

There is no set rule for pastors telling them when it is time to move on.  I know that some denominations tell their pastors when and where to go, but that is not our church’s practice. It’s especially hard to decide when things are going well.  Staying is easier. Knowing when to go requires discernment, and that comes through a close walk with Christ, prayer and a willing heart. 

We have told the Lord that we would go wherever He sends us, and now we believe that He is sending us to church plant again.  There is no little band of believers asking us to come this time.  We have been asked by our denomination to go to a community where it has no presence, and we’ll be starting “from scratch”.  It will be a thrill to watch God create something from nothing.

Since my husband announced our intention just over a week ago to our church, family and friends, the Lord has confirmed the decision in our hearts. There have been reflective conversations and concrete answers to prayer.  It will not be easy to leave, but we will go with confidence that Christ is before us, behind us and beside us.

Monday, March 4, 2013

If Walls could Talk....

Losing our Marbles

I was cleaning out a drawer the other day and came across a small bag of marbles. They must have been in that drawer for at least 14 years. I still remember the day we found them.

When we first moved in to the Old Red Farmhouse, we underwent some major renovations, which included gutting a few rooms down to the studs. When our helpers were ripping out the ceiling of the spare bedroom (downstairs), marbles began to rain down on their heads. We actually collected a whole mason jar full, but only saved a few. Where did the marbles come from?

The small room above had been used as a bedroom for one of the boys in the family who lived here before us.  Apparently when he was little, he shoved dozens of marbles into a knot hole in the floor, knowing he would never see them again.  Little did he know that years later they would come tumbling down on unsuspecting victims!

Here are a few other things we found in the walls and ceilings:

A tintype photo in a gold locket ring. (It's about the size of a nickel.) We wonder how old this is? It looks like Civil War vintage.

These are Beatles collector cards!


And how about this Peggy Fair catalog?  The coat on the cover is only $7.98.  It's full of  other delightful products, like the "Slender Belt" machine and the "Slimtex" and "Abdo-Slim" girdles. Reading this makes me giggle!


So, maybe the walls can talk...